How to Install a Mantel on a Stone Fireplace
How to Install a Mantel on a Stone Fireplace
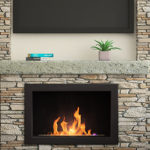
Cozying up by the fire, especially so close to the holidays, is one of the best parts of owning a natural stone fireplace. But, is your fireplace missing something? Stone fireplaces will often be designed with a stone mantel, but some are not. In these cases, homeowners often prefer having a mantel installed or doing it themselves. The most common installation is of a wooden fireplace mantel, and today, we’ll be looking at how to install one on your stone fireplace!
The Decision to DIY
Many brave homeowners opt to install a mantel on their stone fireplace themselves. It’s considered an expert DIY project, and certainly not one to take on if you don’t feel qualified.
The reason a mantel is considered a big project — even after the design is finalized — is for two reasons. The first reason is that mantels can be very heavy. While our steps for installation today will take you through a hollow pine board mantel, some choose to use a solid block of wood anchored with metal cleats. The second reason is that you’ll need to install around your stone, not through it. Granted, you could install a mantel directly into the stone wall of the fireplace, but you won’t be able to change your mind about its installation without going through the difficult and expensive process of repairing the stone.
Steps for Installation
For a wood mantel on a stone fireplace, you’ll need quite a few materials. Gather pine boards for the ledger, supports, and the top and bottom of the mantel. You’ll need wood screws, pocket screws, wedge anchor bolts, drop anchor bolts, and a long concrete drill bit.
Decide on a Location
The first step in installing a mantel on your stone fireplace is to decide upon a location for it. Front and center is most common, but asymmetric styles may suit your room better depending on your personal preference. This location will be for both the ledger board and the mantel. A ledger board is a horizontal wood beam attached to an existing wall and used as a framework for further construction.
Map Out Bolt Holes
Next, you’ll want to measure your mantel and fireplace and determine where bolt holes will go. Determine the strength of your bolts, and how heavy the mantel will be. Keep in mind that any mantel decor you eventually wish to place or hang off the mantel should be factored into that weight. Knowing how much weight your mantel will hold, determine the placement and number of bolts. 3 to 5 holes for bolts is standard.
Drill Into the Mortar
Once you have double (and triple!) checked your measurements, it’s time to drill. Drill into the mortar to avoid drilling holes into your precious stone. The mortar is simpler to work with and easier to fix should you ever choose to remove your mantel.
Add Bolts
Adding bolts to your holes is the next step. For bolts, you may need to use drop anchors with threaded bolts on deeper holes. Some DIYers make sure their holes are at least 10” long, which most bolts don’t come in, hence the use of drop anchors. Clean out the hole by vacuuming up any mortar debris, and tap the drop anchor into the drilled hole. Make sure to push with a metal rod of the same diameter to avoid engaging the drop anchor’s wedging mechanism. Then, tighten the wedge bolt for automatic tension and a snug fit.
Add Supports and Final Features
With the ledger in place, you can install wooden supports using additional screws. You may find clamps to be helpful! From there, you can add final features, like a front-facing plank of wood to cover the supports and ledger. Feel free to also stain or paint the wood as you see fit.
Create Your Custom Fireplace With Impression
At Impression, we help homeowners create custom home features out of natural stone, transforming their living spaces with one-of-a-kind pieces. If you’re in need of a fireplace, contact our team of experienced artisans today to make sure your stone fireplace stands out with a stunning design.